INFORMATION & COMPUTER SCIENCE DEPARTMENT, KFUPM
ICS201, SECTIONS 02 (002
Semester)
INTRODUCTION TO COMPUTER SCIENCE
LAB #00 Java Packages and Literate Programming
Instructor: Bashir M. Ghandi
![]()
Objectives:
To gain experience with:
- Creating Java packages.
- Specifying class path for using user-defined Java packages in both
DOS and JCreator.
- Creating and using Jar files
- Hands on and practice with javadoc utility.
1. Java Packages
A Java package is a collection of sub-packages and/or classes (compilation
units).
The classes in a package may or may not be related by inheritance.
A package is used to group similar and interdependent classes together.
The Java API is composed of multiple packages.
The
import statement is used to
assert that a particular program will use classes from a particular package.
A programmer can define a package and add classes to it.
The package statement is used to specify that all classes
defined in a file belong to a particular package.
The syntax of the package statement is:
package
package-name;
The package statement must be located at the top of a
file, and there can be only one package statement per file.
2. Organizing our classes into Packages
In this course, throughout
this semester, we shall be organizing the classes we develop into related
packages.
You are expected to create
a directory structure similar to the one in Lecture slide number 2 where you
will be storing your classes.
You should create this
structure in both your network directory (z-drive), on your floppy and on your
personal computer if you have one. You
will find this very useful by the end of the course.
In addition to the
directories on the lecture slides, you are required to create a folder, labs with subfolders lab00, lab01, etc. where you will be storing the applications
you developed in the lab.
Notice that if you develop
a class which is to be used as a type (for creating objects) you should store
that in its appropriate package. For
example, Point class should be stored in
the graphics package. However, the
application/applet that uses the type (e.g. TestPoint)
should be stored in the package for the lab in which the application/applet is
developed.
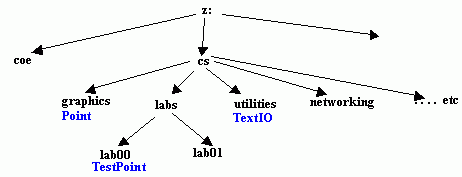
The following diagram
shows how you may organize your packages.
Copy a folder named cs from my computer (icswww) and store it on the root
of your z drive. You will find that the
folder contains a structure similar to the above. You will also find the three example classes, Point, TestPoint and TextIO
in their appropriate packages.
Open each class and see the
package statement for it. For example,
the Point class is shown below:
Example 1: The following defines a Point class, which is
defined in a package called cs.graphics.
package cs.graphics;public class Point { private double x; private double y; public Point(double x, double y) { this.x=x; this.y=y; } public Point() { this(0.0, 0.0); } public double distanceToOrigin() { return Math.sqrt((x * x) + (y * y)); } public double distanceToPoint(Point p) { return Math.sqrt(((x-p.x)*(x-p.x))+((y-p.y)*(y-p.y))); } public void moveTo(double x, double y) { this.x=x; this.y=y; } public void translate(double dx, double dy) { x += dx; y += dy; } public double getX() { return x; }public double getY() { return y; } public String toString() {return "("+x+", "+y+")"; } public boolean equals(Point p) { return this.x == p.x && this.y == p.y; } |
Example 2: The following shows how the Point class may
be imported.
|
package
cs.labs.lab00; import
cs.graphics.Point; import
cs.utilities.TextIO; public class TestPoint { static TextIO stdin = new TextIO(System.in); public static void main(String[] args) throws
java.io.IOException{ double x,y; System.out.print("Enter first point: "); x=stdin.readDouble(); y=stdin.readDouble(); Point p1 = new Point(x,y); System.out.print("Enter second point: "); x=stdin.readDouble(); y=stdin.readDouble(); Point p2 = new Point(x,y); System.out.println("Distance of "+p1+ "
to origin = "+p1.distanceToOrigin() ); System.out.println("Distance of "+p2+ "
to origin = "+p2.distanceToOrigin() ); System.out.println("Distance between
"+p1+" and "+p2+ " = "+p1.distanceToPoint(p2) ); } } |
3. Specifying classpath for user-defined packages
Java tools (compiler, enterpreter, etc) automatically detect the
loacation of the standard Java packages.
However, for user-defined packages, the user must specify their
locations. This can be done in either
of two ways:
- Using the set
PATH command (not recommended): This is used at the DOS prompt before using
SDK tools to compile and execute programs. The format is:
set CLASSPATH=path1;path2...
where
path1, path2, etc are the ROOT folders of the packages.
e.g. set CLASSPATH=”z://”
- Using the
classpath option (recommended): This
is used as an option to a SDK tool to direct it on where to find the user
packages. The format is:
sdkTool -classpath
path1;path2 source or class file.
e.g. To compile TestPoint.java,
we change to its folder and enter the following:
javac –classpath “z://”
TestPoint.java
To execute
TestPoint.java, we execute the following from any folder:
java –classpath “z://”
cs.labs.lab00.TestPoint
Notice that for execution, we need to give the
full name of the class file.
- We can also
compile and execute programs that uses user-defined packages from within
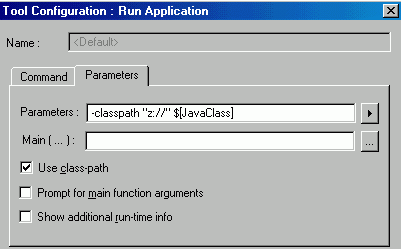
JCreator. To do this, we need to modify the
parameter configuration of both the Compiler and Run Application as shown below:
 |
 |
3. Creating and using jar
files.
Jar is an SDK tool that allows classes in package(s) to be compressed
together into a single file. The
resulting file is called a JAR file.
The advantage of JAR files is obvious.
They save space and they relived the user from having to deal with many
folders. Moreover, the classes in a JAR
file can be accessed/executed directly without the need for inflating
(unzipping) the JAR file.
The statement for creating a JAR file has the form:
jar cvf jar-file
input-file(s)
·
The c option indicates that you want to create a
JAR file.
·
v - produces verbose status output.
·
The f
option indicates that you want the output to go to a file.
·
jar-file is the name that you want the resulting JAR file to
have. You can use any filename for a JAR file. By convention, JAR filenames are
usually given a .jar extension, though this is not required.
·
The input-file(s) argument is a space-delimited list of one or more
files that you want to be placed in your JAR file. The input-file(s) argument can contain the wildcard * symbol. If any of the "input-files" are
directories, the contents of those directories are added to the JAR archive
recursively.
The following example create a JAR file for our cs package:
jar cvf cs.jar cs
Note, you need to execute this while you are outside the cs folder (root
of z drive).
You can now execute the TestPoint example from the JAR file as follows:
java –classpath “z://cs.jar"
cs.labs.lab00.TestPoint
3. Literate Programming
Java has a standard form for inserting documentation comments that
describe classes, methods and fields inside a source file.
Java SDK tool, called javadoc can then be used to automatically generate
a neat set of HTML pages that document the classes.
Documentation comments are delimited by:
/** ………… */
The javadoc utility copies the first sentence of
each comment to a summary table. Therefore, it is best to write that first
sentence with some care. It should start with an uppercase letter and end with
a period. It does not have to be a grammatically complete sentence, but it should
be meaningful when it is pulled out of the comment and displayed in a summary.
Within a documentation comment, we can use the
following tags to highlight some information in the generated HTML document.
|
Tag |
Meaning |
|
@author |
Identifies
the author of the class |
|
@deprecated |
Specifies
that a class member is deprecated |
|
@exception |
Identifies
an exception thrown by a method |
|
@param |
Documents
a method's parameter |
|
@return |
Documents
a method's return value |
|
@see |
Specifies
a link to another topic |
|
@since |
States
the release when a specific change was introduced |
|
@throws |
Same
as the exception tag |
|
@version |
Specifies
the version of a class |
Method comments should contain additional
information for each method parameter using the @param tag.
You
should also use the @return to
indicate the return type of the method.
You omit the @param tag for methods that have no parameters
(parameterless), and you omit the @return tag for methods whose return type is void.
Example 3: The following example shows
the class Greeter using literate programming to generate meaningful
documentation with javadoc utility.
/** A class for producing simple greetings.*/ public class Greeter { public String name;/** Constructs a Greeter object that can greet a person or entity. @param aName the name of the person or entity who should be addressed in the greetings.*/ public Greeter(String aName) { name = aName; }/** Greet with a "Hello" message. @return a message containing "Hello" and the name of the greeted person or entity.*/ public String sayHello() { return "Hello, " + name + "!"; }} |
First, the javadoc utility will format your comments into a neat set of HTML documents. It makes good use of the seemingly repetitive phrases. The first sentence of each method comment is used for a summary table of all methods of your class (see Figure 1). The @param and @return comments are neatly formatted in the detail description of each method (see Figure 2). If you omit any of the comments, then javadoc generates documents that look strangely empty.

