INFORMATION & COMPUTER SCIENCE DEPARTMENT, KFUPM
ICS – 102 SECTION 52, 54 & 55
(001 Semester)
INTRODUCTION TO COMPUTING
LAB #01 Introduction to the Programming Environment
Instructor: Bashir M. Ghandi
![]()
Objectives:
- Understand/Review how to work with
Windows GUI environment
- Review some essential DOS Commands
- Learn how to install and Use JDK to
compile Applications and Applets
- Learn how to use JCreator, an IDE for
Java programming
1. Introduction to Windows
Windows (98, NT or, 2000) is an example of an operating system. The operating system is the first piece of software loaded into memory when a computer starts. It is the operating system that launches/starts other software programs such as word processors, web browsers, etc. The operating system manages all of the resources on the computer; it controls the mouse, the monitor, the printer, etc.
The following shows a condensed version of the Windows NT desktop (Windows 98 is similar). These objects may appear anywhere on the screen.
On windows,
commands are represented by means on menus options, buttons or icons. To execute a command, we single click
the left mouse button while pointing to its menu or button option; or double
click its corresponding icon.
1.1 Using
the Notepad:
Notepad is an application
that comes with window that can be used to type text.
Start Notepad by following the sequence: Start ŕPrograms ŕAccessories ŕNotepad

Type the following sample program exactly as it is shown on the figure below.
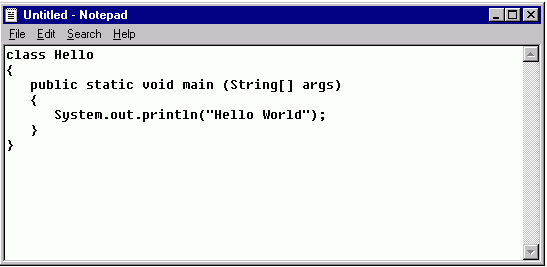
Just type the
characters in. You can move around the text using the mouse or arrow keys. To
delete mistakes, use the "backspace" key or the "delete"
key. To start a new line, just hit "Enter". In typing in the program,
you DO have to get upper and lower case letters, and all punctuation exactly
correct. You do not have to get the spaces exactly correct.
1.2 Saving the Source File
To save the file follow the
following steps:
·
Move
the mouse pointer to "File" and click on it. You will get a
sub-menu. Now click on "Save As".
·
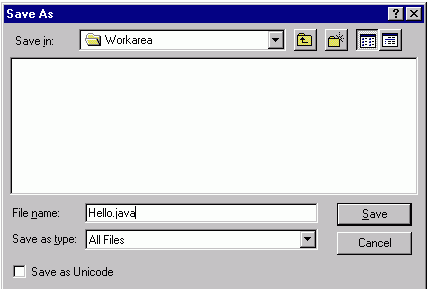
In
the window that appears, use the arrow on the right of the “Save in” box
to change the drive to D: and the folder to Workarea
- In the “File name”
box type: Hello.java
- Clicking on the arrow
to the right of “Save as type” box
and select "All Files".
- If you get exactly the following figure, Click on "Save"
After saving the file, minimize the Notepad window by clicking the minimize button at the top right corner. This should minimize the window to an icon on the Task bar.
1.3
Managing files .
In
addition to providing menus and icons for loading programs, the Windows
operating system also provides facilities for managing user files (creating
folders, copying files, deleting files, etc.).
The
easiest way to manage files is to use the “My Computer” icon (see above).
Double
click on my computer. This display the
disk drives accessible to you.
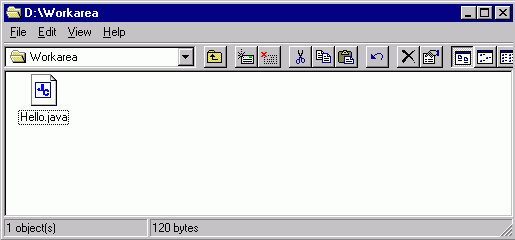
Click on drive D: and click on the folder Workarea to displays the list of files it contains. You should see the Hello.java file listed.
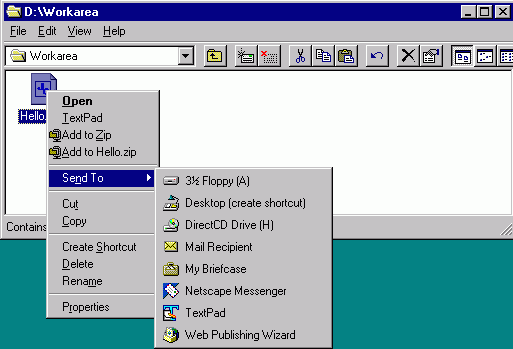
You
can copy the file Hello.java to your floppy by pointing to it and
clicking the right mouse button.
This should open a menu from which you can choose “Send To” followed by “3˝ Fllopy (A)” to save your file on drive A (the floppy).
You
can also copy a file from any folder to any other folder by simple“drag and drop” process.
Drag
and drop means point to a file you wish to copy and click it without releasing
your finger. Then move the mouse to the
folder you wish to copy the file while still pressing the mouse button, when
you reach the folder, release the button.
To
practice this, first let us create a folder “LAB1” under Workarea.
To do this, while in the Workarea, follow the command sequence: File ŕ NewŕFolder and type LAB1 as the name of your folder.
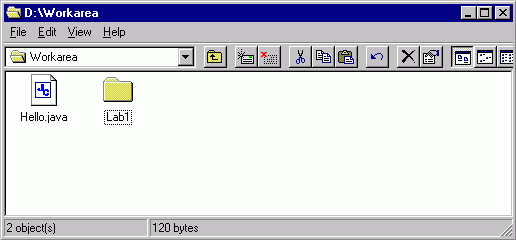
Now click and drag Hello.java file to Lab1
folder. This should move the file to Lab1
folder. Double click on the folder to
view the file.
Now how do we copy the file back to Workarea folder
or to another folder on a different drive?
To do this, we need to double click on My Computer
to open another window and open the folder we wish to copy to.
We then drag the file from the other window to the new window.
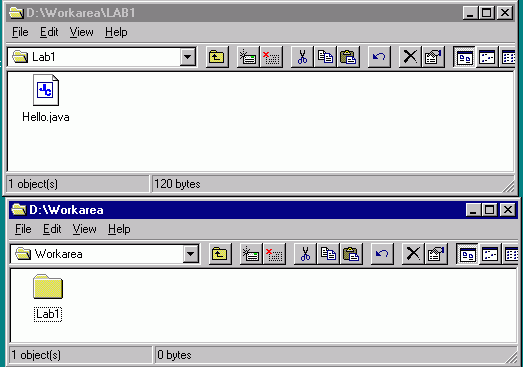
Note:
You can use the button, ![]() to go back
to the previous folder.
to go back
to the previous folder.
You can select all files in a given folder by
pressing A while holding the Ctrl key (Ctrl+A)
You can select adjacent set of files by
selecting the first and then selecting the last while pressing the Shift
key.
You can select any set of files by clicking
them individually while holding the Ctrl key.
To delete a file or group of files, simply select the file (or group of files) and press the Delete Key.
Windows allow more than one application to be running at the same time. All active applications are shown on the Task bar. To switch to Notepad for example, simply click on its icon on the task bar.
1.4 Formatting a diskette.
When you buy a new diskette, you may need to format it before you store files on it.
To do this, insert the diskette in the floppy drive
and double click on My Computer to display list of drives. Right click on drive A. This should open a menu from which you
select “Format” to format your diskette.
2. Some Essential DOS Commands
DOS stands for Disk Operating System. It is a command based operating systems (OS)
used on PC prior to Windows. Although
the OS has changed, DOS commands are still supported by these new OSs.
To be able to use JDK effectively, you need to know
some basic DOS commands. To do this,
first you need to switch to DOS environment, also called, Command Prompt.
You can switch to the DOS command by locating its menu option on the Windows program menu system.
You may find it the JDK sub-menu.
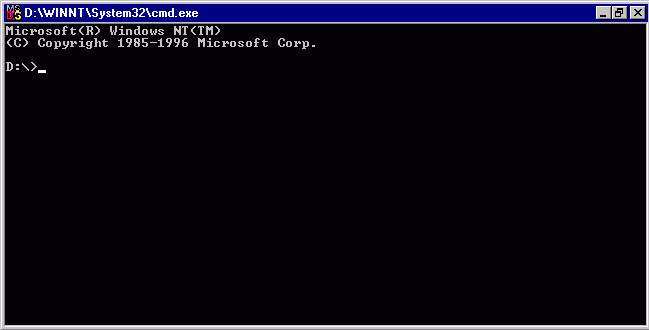
Clicking this should take you to the command prompt which may look like the following figure:
2.1 Changing Drives:
To change to a particular drive, type the drive
letter followed by colon and press enter. (e.g. A: )
If you are not already on drive D: change your drive to D. If you are already on D, change to another
drive and then change back to D.
2.2
Changing folders.
The cd command is used to change folder. You need to give it the folder you wish to
change to, as a parameter.
Examples are:
cd \ This
changes to the root folder (top most folder) of the current drive.
cd workarea This changes to the workarea folder which
is under the root folder
cd Lab1 This changes to the lab1 folder
which is uder the workarea folder.
cd .. This changes to a folder one
step back.
Note that you cannot randomly change from one folder
to another. You need to either follow
them in sequence or give the full path as your parameter. For example, if you are at the root folder
of drive D, then the command
cd Lab1
will not
work.
You have to either follow the sequence:
cd workarea
cd Lab1
Or you have to type:
cd workarea\lab1
2.3 Displaying list of files
The dir command is used to display the list of files in a given folder. Change to the workarea folder and type dir followed by enter. You should see a list like the following.

The list indicates the files and folders in the
current folder along with the date and time they were created or last modified
followed by their size in bytes (for files) or <DIR> to indicate folders.
2.4 Loading a Program
To load a program in DOS, we simply type the program
name and press the Enter Key. For
example, to load Notepad program, type Notepad and press enter.
Note: For the above to work, the program must be either
in the current folder, or in a list of folders specified for the operating
system to search for applications, using the PATH command. We shall discuss the path command when
discussing JDK below.
2.5 Exiting from DOS
The EXIT command is used to exit from the DOS
environment back to windows.
3. Installing and using JDK
3.1 Obtaining JDK
If you need to install JDK on your personal machine,
you can borrow a CD containing the latest version of JDK (1.3) from me. The CD also contains our lecture slide,
some on-line Java books and other utilities.
Alternatively, you can download JDK from Sun
Microsystem free of charge on their internet site: http://java.sun.com/j2se/1.3/
Make sure
you download the Microsoft Windows version.
Also remember to download the documentation as well as HTML
converter. All these are included on
the CD.
3.2 Installing JDK 1.3
To install JDK, simply double click on the
file: j2sdk1_3_0-win-i.exe and follow
the instruction that follows.
It will automatically suggest installing on a folder JDK1.3 on one of your drives as shown below:
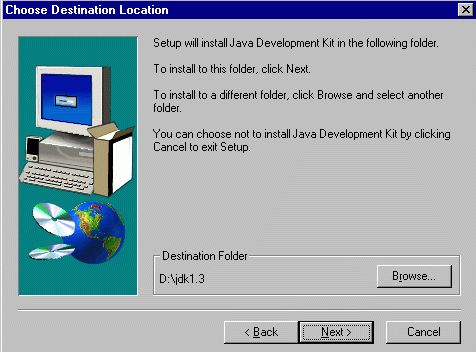
I suggest you use the Browse button to change this
option to something like
D:\Java\JDK
This is a good Idea if you wish to group other Java
related applications together.
After the Installation, a directory structure similar to the following will be created:
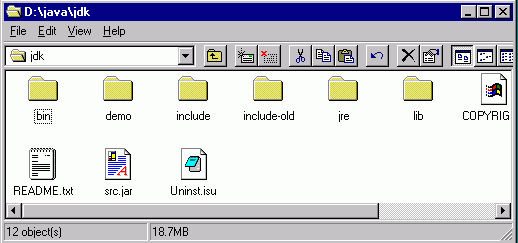
The bin folder is the most important among the folders above. It contains among others, the compiler, javac.exe, the Interpreter, java.exe and the Applet viewer, Appletviewer.exe.

Now recall from our discussion on DOS that for a
program to be executed, it must be either in the current folder or it must me
in the list of folders specified for the operating system to search, using the PATH
command.
Since we would like to be able to execute the Java
tools from any folder, we need to add the folder D:\java\jdk\bin to the
list of folders that Windows OS should search.
Assuming the above is where JDK is installed, the command to do this is:
PATH = D:\java\jdk\bin;%path%
If you are using windows, it is better to add this
in your AUTOEXEC.BAT so that it is executed automatically each time your
computer starts, otherwise, you need to execute this each time you need use JDK
tools.
3.3 Compiling and Running Java Application.
Running a Java source code (.java) involves
two steps:
First, the source file in converted to a bytecode (.class)
using the compiler, javac.exe
Secondly, the interpreter, java.exe is used
to execute the application.
To practice this,
Change to DOS command prompt and change your
drive/folder to D:\workarea
Type DIR and press enter to make sure that the file Hello.java
is there.
Now type the following command to compile the
program:
javac Hello.java
Note that the case (capital/small letter) is very
important to both the compiler and the interpreter.
Type DIR and press enter to see what happened. Another file Hello.class is created.

Now excute the program by typing
java Hello
Note: DO NOT
type java Hello.class
You should get the following output.

3.4 Compiling and Running Java Applets
A Java Applet is a java program that is designed to
run on a Web page. We shall learn more
about applets in lab 4 and 5. For now,
what we need to know is how to compile and run an applet.
Type the following code using Notepad and save is as
HelloApplet.java. You can also
get it from my computer or my homepage
If your are viewing this from my home page, right
click here to download the file.
.
import java.applet.Applet;
import java.awt.Graphics;
class HelloApplet extends
Applet {
public void paint(Graphics g) {
g.drawString("Hello world!", 50, 25);
}
}
Compile this program as we did before using javac.exe
Now one difference between an applet and an application is that it cannot be executed by the interpreter as it does not have the main method. To execute an applet, we need to call it from a HTML file.
Type the following html file using notepad and save
it as HelloApplet.html or copy it from my computer or my homepage.
If your are viewing this from my home page, right
click here to download the file.
<HTML>
<HEAD>
<TITLE> A Simple Program </TITLE>
</HEAD>
<BODY>
<APPLET CODE="HelloApplet.class"
WIDTH=150 HEIGHT=40>
</APPLET>
</BODY>
</HTML>
Now exit to Windows and use my computer to locate
the HelloApplet.html and double click it.
It should display your applet on your browser.
4. Introduction to JCreator
JCreator is one of the many Integrated Development
Environments (IDEs) that are available for developing java applications and
applets.
An IDE is a program which can be used to edit/type,
compile, and execute programs all in the same place.
JCreator is available free at the following internet
site: www.jcreator.com
Of course it is also included on the CD.
We shall be using JCreator for the exercises in this
lab.
It has many useful features such as Syntax coloring,
auto indent, etc.
Locate the JCreator menu option and start it.
Compiling and executing an Application using JCreator
Use the File ŕOpen
menu and locate and open the Hello.java file from the file system.
Compile the Hello.java file by using the Build ŕ Compile File menu, or by clicking the compile button
You should get a message at the bottom saying Process Completed.Now execute the program by using the Build ŕExecute File menu, or by clicking the execute button
You should get the output displayed.
Compiling and executing Applets using JCreator.
The process compiling an applet is the same as compiling an application. However, executing it requires creating a HTLM file. JCreator can be used to create both Java source files and HTML files. It can also be used to create ordinary text files. Open the HelloApplet.java and HelloApplet.html files, compile the java files and switch to the HTML file and execute it. It should display the applet using the applet viewer.
