CSE664
– A Small Tutorial of Magic and IRSIM |
| |
|
1.
Start 2.
Basics 3.
Cells 4.
Errors 5.
Simulation 6.
Pads 7.
FAQ | ||
| 1.
Start Magic |
Add
the following three lines at the end of your ".login" file in your home
directory, then exit your account and login again. setenv
CAD_HOME /usr/local/magic set
path = ($CAD_HOME/bin $path) If
you need to use Magic from a remote unix workstation, say
" "xhost
+" on telnet
to a local workstation, say "apollo" "setenv
DISPLAY "magic"
on apollo Manual
can be found at /usr/local/magic/doc. | |
| 2.
Basic commands |
Remember
to put a ":" before you issue any command, and you will like to get
familiar with macro, which is a one character shortcut for command, to
expedite your design. Also
always put your mouse pointer inside the graphic window, because most
commands need you to do so. Here is an example of the design of an inverter.
1.
Paint:
:paint layers After
you start up Magic, you will see a graphic window. Inside the graphic
window, there is a box with white edge. You can use the left and right
mouse button to locate the box. When you issue the paint command, you will
paint material inside this box. You can use the middle mouse button to
expedite painting if you have already paint some material in same layer or
color. Press the middle mouse button on the color you want to copy, the
area under the current box will be painted with the same color. You can
also use this method to erase something, just copy color from blank area
will erase anything under the current box. 2.Grid
:Grid or just press g 3.Zoom
:Zoom ratio You
can also use macro "z" to zoom the layout so that the area inside the
current box just fill the whole window. Macro "Z" means to zoom out with
ratio 2. 4.Undo
and redo
:undo or macro "u"
:redo or macro "U" 5.Select Put
the mouse pointer on any layer you want to select, then issue the command:
:select or macro "s" If
you use select command several times, Magic will select more adjacent
connected area, which have same voltage. So you can use this command to
check the connection relation of the layout. If you want to select all
layers inside the current box, use the commad:
:select all or macro "a" After
selection, you can issue one of the following command:
:delete or macro "d"
:move [direction [distance]] or macro "t"
:copy or macro "c"
:upsidedown
:sideways
:clockwise [degrees] 6.
Label You
have to label a layer if you want to analysis it in simulation. First
select any layer, then issue the command:
:label position Position
may be any of north, south, east, west, top, bottom, left, right, up,
down, center, northeast, ne, southeast, se, southwest, sw, northwest, nw.
You
can also erase a label by first select the material then issue the
command:
:erase label 7.
Save and load command Before
exit Magic, you need to use save command to save the layout.
:save or :save filename Do
not add .mag extension to filename because Magic will automatically add
it. 8."Wiring"
tools You
can use "wiring" tools to add leg to existed material or make contact
between different layers easily. Steps
to add leg: Switch
to "wiring" tools. Click
the material from which you need to paint leg with left mouse button.
Click
the destination point with right mouse button to paint the leg.
Steps
to make contact: Normally
you can using "box" tools to paint material. Press space key to switch to
"wiring" tools. Press space key three times again will bring you back to
"box" tools. First
paint the area with two layers you want to make contact with, make sure
the two layers are overlapped. Switch
to "wiring" tools. Click
the area you need to make contact with left mouse button. Magic will
display a box to indicate where it will put the contact.
Then
you use middle mouse button to click on the area and Magic will make a
contact for you. | |
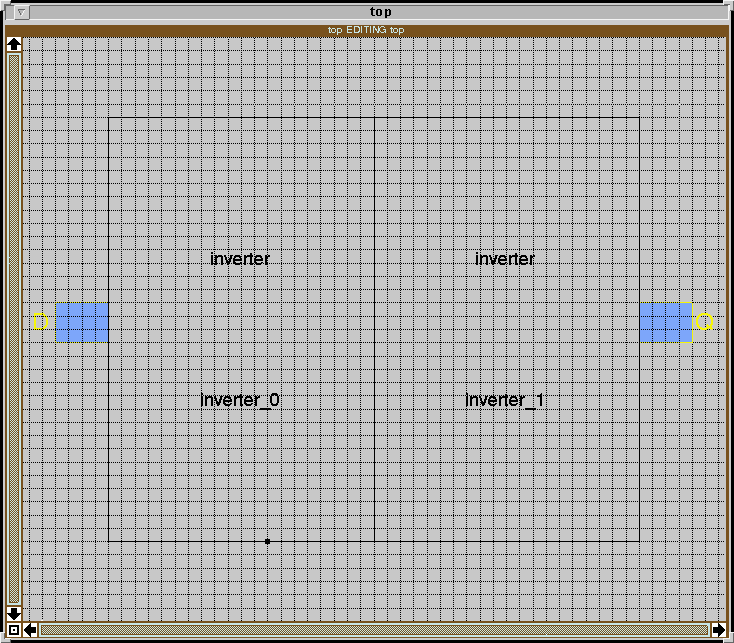
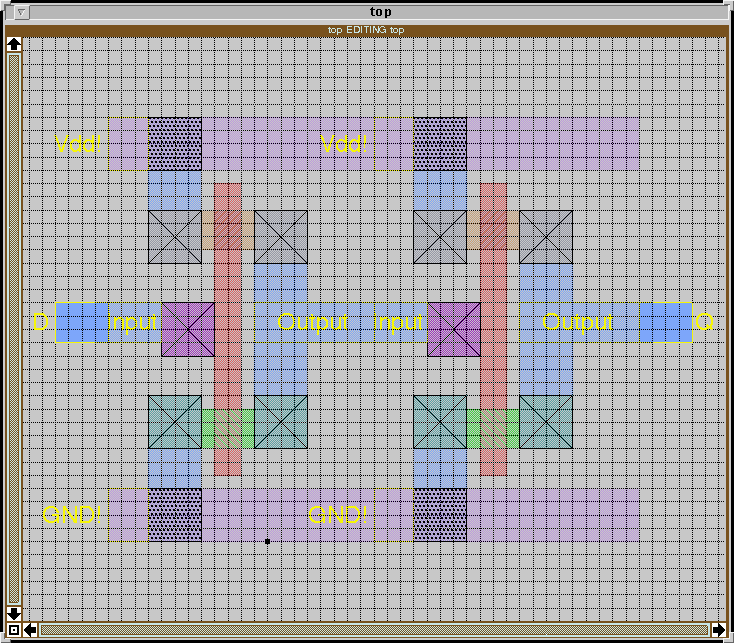
| 3.
Cell hierarchy |
After
you designed the layout for a typical component, you can use it as a cell
to build other circuit. Now suppose we have designed the inverter and save
it as inverter.mag, we can use it as a cell to make another circuit. Here
is an example file top.mag using two inverters use
subcell. Open
magic to edit a new file called top.mag: In
Magic, issue the command below twice:
:getcell inverter
Then
put these two inverters together, select them and issue command to see the
structure of inverter:
:expand or macro "x" You
can unexpand the cell with command:
:unexpand or macro "X"
If
you need to make an array of cells, use the command:
:array xsize ysize or
:array xlo xhi ylo yhi | |
| 4.
Error and warning |
You
can check if there is an error and the reason in any area. First putt a
box on the area you want to check and issue the command:
:drc why If
there are warnings, you can check the reason with the command:
:feedback why Do
not worry if Magic complain two Vdd! or two GND! are not connected
together, because IRSIM knows they are
connected. | |
| 5.
Simulation |
We
will use the top.mag file discussed above as an example to simulate.
1.
First you need to label every thing you need to observe in Magic in top
cell level. Make sure you label on some material in top cell level, and
you should see a sentence like below: Move
label "XXX" from space to metal 1(or other material)
2.
Issue the extract command:
:ext You
will get a file called filename.ext. 3.
In Unix shell, issue the command:
ext2sim filename You
will get a file called filename.sim. 4.
Now you need to get the SCMOS technology file cmos.prm and put it in your working
directory. 5.
in Unix shell, issue the command:
irsim cmos.prm filename.sim Now
you are in IRSIM, you can use "l" and "h" to give low or high voltage to
node, use "ana" command to watch the waveform, and use "s" command to
simulate. Below
is a simple example of simulation process:
llama% irsim cmos.prm top.sim
*** IRSIM version 9.4.1 ***
info: SU format --> using S/D attrs to compute junction
parasitics
Warning: Aliasing nodes 'GND' and 'Gnd'
top.sim: Ignoring lumped-resistance ('R' construct)
Read top.sim lambda:1.00u format:SU
7 nodes; transistors: n-channel=2 p-channel=2
parallel txtors:none
irsim> l GND!
irsim> h Vdd!
irsim> l D
irsim> ana D Q Inverter_1/Input
irsim> s
time = 10.00ns
irsim> h D
irsim> s
time = 20.00ns
irsim> q The
output is as below:
Later
on, you'd like to type and save all your command into a text command file.
Then in IRSIM, you can execute all commands like below:
@ command_filename To
print out the waveform, click the "print" menu and select the "print to
file" submenu. It will ask you for the target filename at the bottom of
window, press ENTER to accept default filename. Then use "lpr" command in
Unix to print the result. | |
| 6.
Pads |
MOSIS
web site 1.
Download the pad files, pads.tar, and the documentation
file into an empty directory In
that directory: tar xvf pads.tar Use
40pin_stuffed.mag as the frame file. For each pad, there are 'in', 'inb',
'out' and 'en' signals. 2.
You can ftp these files, /pub/mosis/cell-libraries/scn12-pads
and /pub/mosis/cell-libraries/scn12_pads.doc,
directly from the MOSIS site (ftp.mosis.org)
| |
| FAQ |
1.
How to printout a Magic file: In
Magic, issue the command :cif
You
will get a file with cif extension. Then in Unix shell, type the command
to print the layout: pplot
filename.cif | lpr When
the program prompts out: Do
you want a plot (Yes/No/ChangeScale) [y] ? Press
ENTER to printout the layout. You
can also print the layout to a postscript file and print out the file
later. pplot
filename.cif > filename.ps lpr
filename.ps 2.
I can not load the tutorial files: In
Magic, issue the command: :addpath
~cad/tutorial Now
you can load the tutorial files. If
you do not wish to issue this command every time, you need to create a
.magic file in your home directory and put this command into it. So this
command will be executed when Magic is started. 3.
IRSIM can not find the node I have labeled: First,
if several nodes you labeled are connected together, Magic will only keep
one label. Sometimes when you make mistake to connect some nodes to GND!
or Vdd!, you can not see this node in IRSIM. Second,
if you want to see the node in top cell level, make sure you paint some
material on top cell level and label on it. If you just label in top cell
level but on layer in subcell, Magic will not label it correctly.
You
have to use the format below to access label inside a subcell:
cell_name/local_label
| |