INFORMATION & COMPUTER SCIENCE DEPARTMENT, KFUPM
ICS201, SECTIONS 54, 56 and 57
(002 Semester)
INTRODUCTION TO COMPUTER SCIENCE
LAB # 09: Practice with
Database Using JDBC
Instructor: Bashir M. Ghandi
![]()
1. Objectives:
To gain experience with:
- Some basic SQL commands
- Creating database using Microsoft Access
- Accessing database from Java application using JDBC
- Scrolling through a database from Java
applications.
2. Some SQL Commands:
SQL stands for Structured Query Language. It is used to manage database tables and the
data contained in them (i.e it provides commands for creating and deleting
tables as well as commands for viewing, adding, updating and deleting data from
tables). One important thing about SQL
is that it is supported by all popular database management systems including
Oracle, DB2, Access, etc.
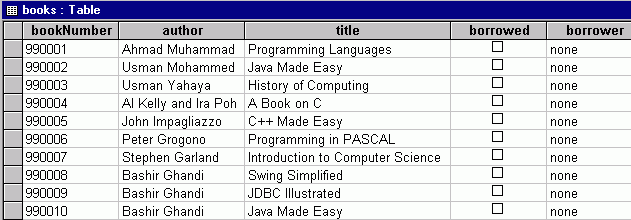
To illustrates some basic SQL commands, we shall
make use of the following table.
Viewing data:
To view data from a table or collection of related tables, we use the SELECT statement as shown in the following
examples:
|
Command |
Meaning |
|
SELECT * FROM books |
Shows data from all columns and all rows of the
table books. |
|
SELECT bookNumber,
author FROM books |
Shows data from bookNumber and author columns and
from all rows |
|
SELECT bookNumber,
author FROM books WHERE author = ‘Bashir
Ghandi’ |
Shows data from bookNumber and author columns but
only for those rows in which the author is ‘Bashir Ghandi’ |
Other operators we can use in the WHERE clause
are: <, >, <=, >=, AND, OR,
NOT, LIKE.
Note: Like is used together with ‘%’ character to
find rows for which a certain field begins or ends with some character.
Example: SELECT
bookNumber, author FROM books WHERE title LIKE ‘P%’
Adding Data: To add data into a table, we use the INSERT command as shown in the following
examples:
|
Command |
Meaning |
|
INSERT INTO books VALUES
(‘990011’, ‘Ahmad Yusuf’, ‘JAVA 2’, 0, ‘none’) |
inserts a complete record at the end of the books
table. |
|
INSERT INTO books
(bookNumber, title) VALUES (‘990011’, ‘JAVA 2’) |
inserts a partial record (only for the fields
specified) |
Deleting data:
To delete a certain row, use the DELETE
command. Example:
DELETE FROM books WHERE
bookNumber = ‘990011’
Updating data:
To update data, use the UPDATE
commands as follows:
UPDATE books SET author =
‘Ibrahim Usman’, title = ‘Java Applets’
WHERE bookNumber =
‘990010’
2. Accessing Database from Java Application using JDBCTM
JDBC (Java Database Connectivity)
is designed to allow the to use of SQL to query a wide variety of different
database types. Just as a printer driver allows developers to write
applications without concern for low-level details of specific printers, JDBC
is supposed to free the developer from low-level concerns about particular
database types. It should permit the programmer, for example, to query an
Access database with exactly the same source code as with an Oracle database.
JDBC is similar to Microsoft's ODBC
(Open Database Connectivity), except that it is supposed to bring the added
advantage of being platform independent (because it is written in Java).
To use either JDBC or ODBC,
however, one needs a database driver that can communicate with the particular
DBMS. Most of the JDBC drivers are not
free and are a bit expensive. On the
other hand, drivers for ODBC are already available. (They come with Windows NT
and 98).
Since JDBC and ODBC are very
similar, a set of routines were written to translate JDBC commands to ODBC,
thus allowing JDBC to use ODBC drivers. These routines are called the JDBC-ODBC bridge. This
bridge is free, and comes with JDK.
To access to a database from a Java
application, we need to follow the following steps:
Step
1: creating database file.
First we need to create a database
file using a DBMS such as Microsoft Access.
Start Microsoft Access and create a database file named Library.mdb
by clicking File - New – database. An access database file can
contain many tables.
Create a table, books, by
clicking the option “Create table by Design view”. To create a table you have to specify the
column names and the corresponding data type. the table books should
have same structure as the one shown in the figure on page 1. After creating the table, populate it with
some records..
Step
2: configure ODBC:
The next step is to configure ODBC to make it aware
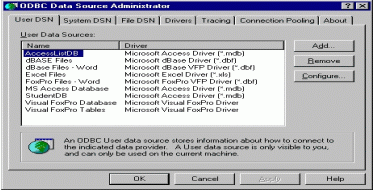
of our database. Go to the control
panel and click on ODBC
data sources you will find the following window.
|
|
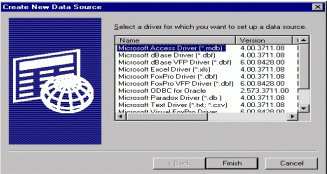 |
Click on user DSN and select Add button, then you will get the window shown on the right
above.
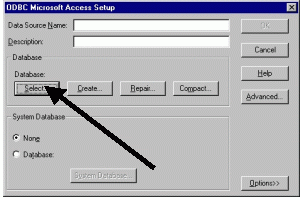
Select Microsoft Access Driver and click the Finish button and you will get the
following window.
|
|
 |
In the data Source name Text field, give the data
source name (any name but this is the name you will use in the java
application. Let us name our data source Library.)
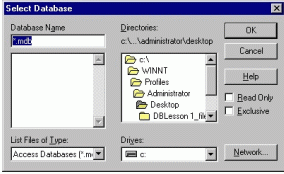
Now click the select button and you will get the window shown in
the right side of the above picture.
In that window select the database file you created
in step 1. Then click OK for all the previous windows.
With this, you have successfully set the ODBC
Configuration.
Step
3: Writing a Java application that
communicates with the database.
Writing a Java
application to communicate with a database involves three main tasks, namely:
- Establishing a connection with a data
source
- Sending queries and update statements to
the data source
- Processing the results
1. Establishing a Connection:
Establishing a connection involves loading the
driver and then making the connection.
Loading the driver or drivers you want to use is
very simple and involves just one line of code as follows:
Class.forName("sun.jdbc.odbc.JdbcOdbcDriver");
Note: The method
forName() generates ClassNotFoundException if JDBC is not
installed. This is a checked exception,
so we must handle it before the above statement can compile.
Making the Connection involves creating a Connection
object that links the driver to the DBMS.
Connection con =
DriverManager.getConnection(url, "myLogin", "myPassword");
or
Connection con =
DriverManager.getConnection(url);
The second version assumes you do not need to login
the computer hosting the database file.
Since we are using the JDBC-ODBC Bridge driver, the
JDBC URL will start with jdbc:odbc: . The rest of the URL is
generally the data source name defined in the configuration of ODBC
(step2). In our case it is Library. Thus, we should have:
Connection con =
DriverManager.getConnection(jdbc:odbc:Library);
2. Creating JDBC Statements and
Sending SQL statements to the data source
The next step after establishing a connection is
to create a Statement object using the Connection object as
follows:
Statement statement =
con.createStatement();
The Statement object created above has methods
which are used to send SQL statement to the DBMS. Which method is used depends on the SQL statement being
sent. For a SELECT statement,
the method to use is executeQuery() . Whereas, for statements that
create or modify tables, the method to use is executeUpdate.
String query = "select * from books";
ResultSet result =
statement.executeQuery(query);
Notice that executeQuery() method returns
an object of ResultSet which contains the result of the query.
The executeUpdate() is similar, except
that we are not expecting result from the data source.
String query2 = "INSERT INTO
books VALUES ('990011', 'Ahmad Yusuf',
'JAVA 2', 1, 'none')";
statement.executeUpdate(query2);
3. Processing Results obtained from
data source.
The variable result
, which is an instance of ResultSet , contains the rows of the books
table. In order to process each row, we
need to go to the row and retrieve its values. The method next() moves
what is called a cursor to the next row and makes that row (called the current
row) the one upon which we can operate. The cursor is initially positioned just
above the first row of a ResultSet object, the first call to the method next()
moves the cursor to the first row and makes it the current row. Successive
invocations of the method next() move the cursor down one row at a time
from top to bottom.
The ResultSet object has
a getMethod for each type (getString, getInt, getDouble, getLong, getFloat,
etc) which can be used to retrieve the value of a field depending on its
type. For example, the following loop
is use to retrieve and print the bookNumber, author and title fields of the
books table.
while(result.next()) {
System.out.println(result.getString("bookNumber")+
"\t"+
result.getString("author")+
“\t"+
result.getString("title"));
}
Note: Most of the
methods of the ResultSet object (e.g next()) generates SQLException which is a checked exception, so again we
must handle this exception before our program can compile.
Example 1: The following is a
complete example that reads data from the books file and prints the first three
fields.
|
import java.sql.*; public class
SelectQuery { private Connection con=null; private Statement selectStatement; private ResultSet selectResult; public void connectToDB() { try{ System.out.println("Loading the
driver ..."); Class.forName("sun.jdbc.odbc.JdbcOdbcDriver"); System.out.println("Connecting to
database ..."); con =
DriverManager.getConnection("jdbc:odbc:Library"); if(con!=null) System.out.println("Connected
to database ..."); } catch(SQLException sqle) { System.out.println(sqle.getMessage()); } catch(ClassNotFoundException cnfe){ System.out.println(cnfe.getMessage()); } } public void closeDB(){ try { if(con != null) con.close(); } catch(SQLException sqle) { System.out.println(sqle.getMessage()); } } public void processBooksQuery(){ String
query = "select * from books"; try{ selectStatement =
con.createStatement(); System.out.println("Sending
Query to database Table ...\n"); selectResult = selectStatement.executeQuery(query); System.out.println("The
Query : "+query+"\n"); System.out.println("Query
results\n"); while(selectResult.next()) { System.out.println(selectResult.getString("bookNumber")+ "\t"+selectResult.getString("author")+ "\t"+selectResult.getString("title")); } selectResult.close(); } catch(SQLException sqle){ System.out.println(sqle.getMessage()); } } public static void main(String[] args){ SelectQuery sq = new SelectQuery(); sq.connectToDB(); sq.processBooksQuery(); sq.closeDB(); } } |
3. Scrolling through a database
From Java 1.2, JDBC has
been improved to handle not only scrolling forward, but also scrolling backward
through a database table. It is also
possible to scroll to a particular row number.
To scroll both forward
and backward, we use another createStament() method of the Connection object
which has the form:
Statement statement = con.createStatement( ResultSet.TYPE_SCROLL_SENSITIVE, ResultSet.CONCUR_READ_ONLY );
The constant
CONCUR_READ_ONLY is used if no update is allowed from the application. To allow for update, we use the constant, CONCUR_UPDATABLE.
Now apart from the
next() method used to move to the next record, the Statement object created as
shown above has additional methods as follows:
|
Method |
Purpose |
|
first() |
moves the cursor to
the first record |
|
last() |
moves the cursor to
the last record |
|
previous() |
moves the cursor to
the previous record |
|
absolute(int n) |
moves the cursor to
record number n counting from the top |
|
relative(int n) |
moves the cursor to
record number n counting from the current record |
|
boolean isFirst() |
returns true if the
current record is the first – call this before calling first() |
|
boolean isLast() |
returns true if the
current record is the last – call this before calling last() |
Note: Like the
method next(), most of these methods throw SQLException, so we should catch
that it when calling them.
4. Assignment
1.
Modify Example1 such that:
(a) It displays all books whose author is Bashir Ghandi
(b) It displays a book authored by Bashir Ghandi and whose
title is Java made Easy
(c) It displays all books that are not borrowed
(d) Displays all books whose title begins with “Java”
Note: You need to define the String variable query
four more times and comment the rest so that only one is active at a time.
2.
Add another Table named members
to the Library database with fields IDNumber, Name, NumberOfBooks
and populate it with some members. Now
modify example 1 such that it displays:
(a) List of members who borrowed at least one book
(b) List of members who borrowed more than one book
(c) List of title and author of a book along side the name
of the borrower who borrowed the book.
3.
The program,
BooksDisplay is intended to allow scanning through the books in the Library
database one book at a time using the buttons provided.

You can execute the
compiled version of this application from lab09 folder to see the intended
effect. You are to complete the
application by addition action listeners to the buttons so that they behave as
intended.
