INFORMATION & COMPUTER SCIENCE DEPARTMENT, KFUPM
ICS102, SECTIONS 52, 54 & 55
(001 Semester)
INTRODUCTION TO COMPUTING
LAB #05 More on Applets
Instructor: Bashir M. Ghandi
![]()
Objectives:
To gain experience with:
- Applet Life-Cycle
- Input using dialogue windows
- Input using parameters
- Inserting Images
- Inserting sound (without repetition).
1. Applet Life Cycle
All the applets we create must extend the Applet class defined in
the java.applet package. "Extend" means that our applets will build
upon, or inherit, the methods and fields of the Applet class.
The Applet class
provides a set of methods used by any Web browser when it runs an applet. They
are:
init() -This is the first method called when an applet is loaded.
Initializing variables and objects, and adding applet components, such as Label
and TextField objects, on the screen are performed here.
start() - This method is called right after the init(), and everytime the
applet becomes active after it has been inactive. An applet becomes inactive
when the browser window is minimized or the user leaves the page to visit
another Web page, and then returns.
paint(Graphics g) –This method is called when the
applet's display area is covered by a menu, when the area is re-sized or when the repaint() method is called.
stop() -This method is called when the applet becomes inactive.
destroy() - This method is called when the browser closes.
By default, these
methods do nothing, but we can make them do something by re-writing (overriding)
them in our applets. In the applets
programs we have written so far, we have been overriding the paint
method to make the browser display what we want. In this lab, we shall see how the init method can be used
to initialize the variables required by an applet.
2. Input using dialog windows
The applets we have written so far are nice, but
they aren’t interactive. Interactive
applets allow the user to communicate with them through graphical interfaces such
as buttons, text fields, etc. In this
section, we shall learn a simple input method called input dialog window.
To display a dialog window, we use showInputDialog() method of the JOptionPane class, which is contained in the javax.swing package. This waits for the user to enter a value and then press the OK button.
The problem with input dialog is that it can only read
string input. Thus, if the user enters a numeric value such as 23, it treats it
as the string “23”. However, this is
not a problem as each of the numeric primitive types, there is a class that
contains a method that can be used to convert a string value to a value of its
type. These classes are some times called
wrapper classes as they can be used to change primitive values into
objects – more about these later.
|
Primitive type |
Wrapper Class |
String to number conversion method |
|
byte |
Byte |
parseByte() |
|
short |
Short |
parseSort() |
|
int |
Integer |
parseInt() |
|
long |
Long |
parseLong() |
|
float |
Float |
parseFloat() |
|
double |
Double |
parseDouble() |
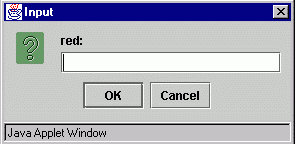
Example 1: The following example reads an amount for each of
the primary colors (red, green and blue), and use them to create a color
object, which is then used to draw a circle.
Notice that since the input is required only once,
when the applet is loaded, it does not make sense to put the code for reading
input in the paint method. The right
palace for these is the init method.
|
import java.applet.Applet; import java.awt.Color; import java.awt.Graphics; import java.awt.Graphics2D; import java.awt.geom.Ellipse2D; import javax.swing.JOptionPane; /*
uses the input dialog window to read
the amount of primary colors to be used in displaying a circle */ public class ColorSelect extends Applet { private
float red; private
float green; private
float blue; public
void init() {
String input; input
= JOptionPane.showInputDialog("red:"); red =
Float.parseFloat(input); input
= JOptionPane.showInputDialog("green:"); green
= Float.parseFloat(input); input
= JOptionPane.showInputDialog("blue:"); blue
= Float.parseFloat(input); } public
void paint(Graphics g) { final
int DIAMETER = 100;
Graphics2D g2 = (Graphics2D)g; Color
fillColor = new Color(red, green, blue);
g2.setColor(fillColor);
Ellipse2D.Double circle = new
Ellipse2D.Double((getWidth()-DIAMETER)/2, (getHeight()-DIAMETER)/2, DIAMETER,
DIAMETER); g2.fill(circle); } } |
Notice that the getWidth()and
getHeight() in the above example returns the width and height of the
applets display area. They are very
useful methods when displaying items at the center of the applet display area.
3. Input using parameters
Another way of supplying input is using the <PARAM> tag in the HTML file that loads the applet. This has the form:<PARAM NAME=”….” VALUE=”….”>where NAME is the parameter name and VALUE is its value. We can have any number of PARAM tags between the <APPLET ….> and </APPLET> tags.
<HTML><HEAD><TITLE> A Simple Program </TITLE></HEAD><BODY> <APPLET CODE="ColorSelect2.class" WIDTH=400 HEIGHT=400><PARAM NAME="Red" VALUE="0.8"><PARAM NAME="Green" VALUE="0.7"><PARAM NAME="Blue" VALUE="0.1"></APPLET> </BODY></HTML> |
Once parameters are passed using the PARAM tags, the getParameter() method can be used to get the values from within the applet. Again, the getParameter() method returns a string, so to get numeric values, the appropriate parse… methods are used. Example 2: The following example is the same as the previous, but the input is passed using PARAM tag in the HTML file as shown above.
import java.applet.Applet;import java.awt.Color;import java.awt.Graphics;import java.awt.Graphics2D;import java.awt.geom.Ellipse2D; /* uses html parameters to pass the amount of primary color to be used in displaying a circle */public class ColorSelect2 extends Applet { private float red; private float green; private float blue; public void init() { // get red, green, and blue values from the applet parameters red = Float.parseFloat(getParameter("Red")); green = Float.parseFloat(getParameter("Green")); blue = Float.parseFloat(getParameter("Blue")); } public void paint(Graphics g) { final int DIAMETER = 200; Graphics2D g2 = (Graphics2D)g; Color fillColor = new Color(red, green, blue); g2.setColor(fillColor); Ellipse2D.Double circle = new Ellipse2D.Double((getWidth()-DIAMETER)/2, (getHeight()-DIAMETER)/2, DIAMETER, DIAMETER); g2.fill(circle); }} |
Example 3: The following example is same as above except that the color object is created in the init method.
mport java.applet.Applet;import java.awt.Color;import java.awt.Graphics;import java.awt.Graphics2D;import java.awt.geom.Ellipse2D; /* uses html parameters to pass the amount of primary color to be used in displaying a circle */ public class ColorSelect3 extends Applet { private Color fillColor; public void init() { float red = Float.parseFloat(getParameter("Red")); float green = Float.parseFloat(getParameter("Green")); float blue = Float.parseFloat(getParameter("Blue")); fillColor = new Color(red, green, blue); } public void paint(Graphics g) { final int DIAMETER = 300; Graphics2D g2 = (Graphics2D)g; g2.setColor(fillColor); Ellipse2D.Double circle = new Ellipse2D.Double((getWidth()-DIAMETER)/2, (getHeight()-DIAMETER)/2, DIAMETER, DIAMETER); g2.fill(circle); }} |
4.
Inserting Images
Images of type .GIF and .JPEG can be loaded into a
java applet by creating an object of class Image as follows:
Image myImage = getImage(baseURL,
relativeLocation);
baseURL: This
is either the URL of the HTML file which loads the applet, which can be obtained
using the getDocumentBase() method or the URL of the applet’s .class
file, which can be obtained using the getCodeBase() method.
In our examples, since the HTML file and the .class
file are in the same folder, we can use either of the methods.
relativeLocation: this is the location of the
image file relative to the baseURL.
For example, suppose the image file is in: FILE:/D:/WORKAREA/LAB05/IMAGES/BASHIR.GIF
and the HTML file and the .class file are in FILE:/D:/WORKAREA/LAB05/
then the relativeLocation should be specified as
IMAGES/BASHIR.GIF since the getDocumentBase() (or getCodeBase())
will return FILE:/D:/WORKAREA/LAB05/
After the image is loaded, we display it by using the drawImage()
method of the graphics / graphics 2D object as follows:
g.drawImage(myImage, x, y,
width, height, this);
where x, y specifies the top left corner of the
rectangular area to be used in displaying the image, width and height are the
width and height to be used in displaying the image and this is
the applet reference. If no width
and height are specified, the actual width and height of the image are
used.
An image object has two methods getWidth(this) and
getHeight(this) which can be used to get the with and height of the
image. This is useful if the image need
to be centered on the applet display area. this is a reference to
the image object.
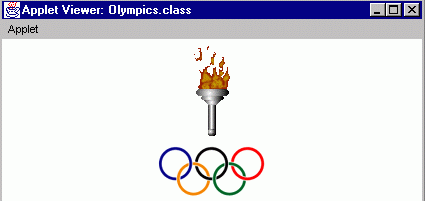
Example 4: The
following is an example displaying the Olympic touch.
|
import java.applet.Applet; import java.awt.Graphics; import java.awt.Color; import java.awt.Image; /* displays image */ public class Images
extends Applet { Image torch; public void init() { torch = getImage(getCodeBase(),
"images/olympicTorch.gif"); } public void paint(Graphics g) { setBackground(Color.white); g.drawImage(torch, 5, 5, this); g.drawImage(torch, 200, 200 , 100, 100, this); } } |
5. Playing
Sound
Audio clips of type .au can be loaded and
played in a java applet by creating an object of class AudioClip as
follows:
AudioClip myAudioClip =
getAudioClip(baseURL, relativeLocation);
The baseURL and relativeLocation are as
explained in loading images.
Once an audio clip object is created, it can be played
by calling its play() or loop() method. The play() method plays the clip only once from the beginning to
end. The loop() method on the other
hand, plays the clip repeatedly until either the stop() method is called
or the applet is closed.
Example 5: The following example displays images and continuously
play a sound clip until the applet window is closed.
|
import java.awt.Graphics; import java.awt.Image; import
java.applet.AudioClip; /* plays audio sound and displays image */ public class AudioSound
extends java.applet.Applet { Image myImage; AudioClip music; public void init() { myImage = getImage(getDocumentBase(),"images/bashir.jpg"); music = getAudioClip(getDocumentBase(),
"audio/spacemusic.au"); } public void paint(Graphics g) { int iWidth = myImage.getWidth(this); int iHeight = myImage.getHeight(this); int xPos = 10; // 50% g.drawImage(myImage, xPos, 10 , iWidth/2, iHeight/2,
this); // 100% xPos += (iWidth/2) + 10; g.drawImage(myImage, xPos, 10, this); xPos += iWidth + 10; g.drawImage(myImage, xPos, 10 , iWidth + 15, iHeight +
15, this); music.loop(); } } |
6.
Assignments
1.
Write an applet that
uses dialog window to read the following input:
·
A message to display (
example a name)
·
The name of the font to
use in displaying the message (Serif, SansSerif, etc)
·
The font size to be used
in displaying the message.
You
applet then displays the message according to the above criteria using yellow
text color and blue background color.

2.
Modify the above program
so that the input is provided using the PARAM tag in the html file that loads
the applet.
3. Write an applet that displays the Olympic torch (OlympicTorch.gif) on top of the Olympic logo (OlympicLogo.gif) and plays the audio clip (spacemusic.au) continuously until the applet is closed. The two images should be centered horizontally on the applet display area. (Hint: use the getWidth(this) and getHeight(this) methods of the image objects to get their sizes.